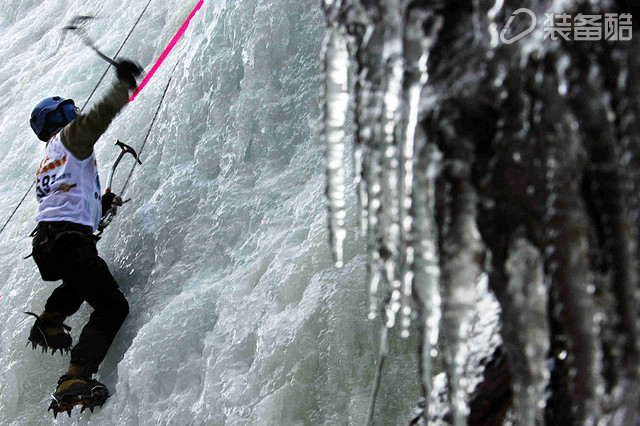
Let you see and understand the ice climbing tutorial, climbing 5+ is not a dream || Ice slope walk Basic equipment Ice slope walk: helmet, cramp Walking on ice slopes is the basic activity of other activities on ice. Novice learning must begin with walking on ice slopes. Learning to walk on ice slopes requires the use of crampons, but it is inconvenient to wear seat belts after wearing crampons. It is therefore recommended to wear a seat belt and then wear crampons. First, the matters needing attention 1. The crampons and hail are not sharp weapons and it is forbidden to play. 2. When walking on an ice slope, two people must not walk on a vertical line. Second, know wear walking equipment Helmet Near the ice wall, you must wear a helmet. Safety first, just in case. 2. Seat belt Including waist ring (upper, large), leg ring (lower, small *2), protective ring (medium, orange), equipment ring (both sides *4). It is recommended that you wear the seat belts before you wear crampons. Wear law: Lift the waist ring and straighten the leg loop. Wear it like a pair of trousers, buckles need to be rebated, buckled iron parts exposed after the button into a "C" shape, check each other equipment. 3. Claw There are twelve teeth in the crampons, which are front teeth (*2), auxiliary teeth (*2), and XX teeth. Adjust the size to suit your own shoes before you wear them. Be sure to wear tight. After the strap is fastened, the exposed part of the strap should not be too long to avoid stepping on. We observe the orientation of the claw teeth. If we stand on the ice slope and slide downward, the teeth of the crampons will be inserted deeper and deeper into the ice. Third, walking practice (the distance between the two feet should not be too small, so as not to risk their own tripping) Walking on the ground Try to get the crampons' teeth vertically into the ice. Novice should avoid running. 2. Walking on the ice slope (steps should be stepped on each step before walking, stepping on unstable steps) Basic footwork: French, full-footed ground, two feet separated into a figure eight. German style, the front teeth and the auxiliary teeth enter the ice, the two feet are parallel, and the tip of the toes is slightly raised when the ice is kicked, and the toes can be curled up. Ice slope (center of gravity forward): a French, the greater the slope, the more open the eight characters. b German style, suitable for steep slopes. c Hybrid, flexible flexibility. d Backward type (center of gravity throws back), slightly squat, feet parallel, forward to back. Advantages, stability. Disadvantages, inconvenient to see the road. e zigzag retreat (center of gravity backwards), set the advantages of retrogression, to avoid its shortcomings. Before the two legs are interposed, the turning point of the son is self-determined. Under the ice slope (center of gravity backwards): two feet apart shoulder width, parallel down, a short while. Step by step down, each step should be stable, when you step on ice, you can slightly (it's slightly oh) slightly straighten. Don't rush to be quick. Turn on the ice slope: turn slowly, step on steadily, don't worry, be careful, don't be afraid, don't worry. || Rise and fall This equipment: helmet, crampons, seat belts, main lock, eight-character ring (or atc), oxtail Rising equipment: oxtail The oxtail is formed by a rope connected with a riser and a main lock rope. Put the rope cover through the protection ring of the seat belt. The ascender and the main lock pass through the rope cover and tighten. Decline equipment: main lock and eight-word ring The main lock is hung on the protection ring and is located above the oxtail. The large ring of the eight-word ring is inserted into the main lock. a Ascending start, the rope is inserted into the riser, and the main lock of the oxtail is passed through the hole at the front end of the riser to lock the rope and the riser together. Hold the riser and start walking uphill. Note: The riser only has a protective effect and cannot be used to pull people up. b Rising above the node and rising up to the node, the riser must not be too close to the knot of the rope. Remove the bull lock, lock it on the main lock of the node, lock the screw, remove the riser, place the riser on the other rope, hold the riser, and remove the bull lock to lock the riser And rope. c Ascends and descends and rises to the highest point. The riser must not be too close to the knot of the rope. Remove the cow lock, lock it on the main lock and lock the screw. Remove the riser buckle on the belt's equipment ring. Use four-point method to put the rope on the eight-character ring, buckle the small ring into the main lock, and lock the thread buckle. Turn the eight-character ring upward until the oxtail is unforced after pulling the rope. Pull the falling end of the rope by the right hand and place it on the side of the hand and hold it. Then use one hand. The left hand removes the bull lock on the equipment ring or rope. The left hand passes around from below and grips the falling end of the rope. Sit backwards, walk backwards, and put your hands on the ropes. d descends over the node, descends to the node, removes the bull lock, buckles on the knot lock, and locks the thread. Take out the small ring from the main lock and fasten it into the large ring and take out the rope. Take the next rope and use the four-point method to put the rope on the eight-character ring, buckle the small ring into the main lock, and lock the thread. Turn the eight-character ring upward until the oxtail is unforced after pulling the rope. Pull the falling end of the rope by the right hand and place it on the side of the hand and hold it. Then use one hand. The left hand removes the bull lock on the equipment ring or rope. The left hand passes around from below and grips the falling end of the rope. Sit backwards, walk backwards, and put your hands on the ropes. ||Climbing ice climbing Basic equipment: helmet, hail, crampons, seat belts Hail: It is very important that the hail is to the climber, like the miracle to the knight. A hailstone called a hand is like a climber's extended arm. It can draw a beautiful arc in the snow and ice to create another record. The hail is divided into three parts: handle, body and tip. The handle, nowadays, usually has a hook under the handle of the hail. He can protect the fingers and he also frees us from the straps. The tip of the cymbal, with a sharp edge on top of it, is used to cut the ice and remove the hail. The teeth below make it more secure on the ice wall. When removing the hail from the ice wall, move up and down the hail and the upper blade will cut the ice and remove the hail. Do not shake the hail from side to side, as this will damage the tip. Big hail climbing practice. First, the matters needing attention 1. The crampons and hail are not sharp weapons and it is forbidden to play. 2. When climbing the line, fall objects on the top to call "ice" to remind the following people. Second, swing Waving his arm to bring hail. Before tipping into the ice, pay attention to turning your wrist like throwing a flying knife. Note that try to get the tip of the skimmer straight into the ice. Third, climbing Before the basic action is climbed, the climber and the protector inspect each other's equipment. The protector pays attention to the thread lock. At the time of snoring, the lower body is affixed to the ice and the upper body is backwards. It is easy to look at the above, looking for good spots, and it is easy to play. The point should not be too close to the rope so as not to damage the rope. When kicking the ice, the buttocks move backwards to make it easier for you to find your feet. The point is the best foot. - Zhou Peng kicked the tip of the ice slightly to make the crampons' front teeth vertically into the ice. Four points, don't go if you don't, don't try fast, safety first. When climbing vertical ice requires standing, the climber should try to keep his body upright and the body naturally close to the ice. Toe down will reduce the degree of engagement of the crampons with the ice surface, and at the same time it will easily cause fatigue in the lower leg. The correct posture is slightly tilted up on the toes. When climbing a line, the steeper the place, the greater the two feet apart. Rope protection ring connection with a double-character knot, the rope head can be used to prevent the knot off. Guess you still want to see: Ice climbing, an addictive drug [climbing-introduction] [Summary of ice climbing sites] Please jump to a waltz on an ice wall! Play ice climbing must see, ice climbing notes build, be careful! The ultimate icy, ice climbing to the top, happy play! Ice climbing equipment Raiders in this! Learn to identify the quality of the ice wall, create ice and enchantment, danger can not get in! Zero-based fun ice climbing, who said impossible? [climbing technology detailed] Currency Counters Cleaning Kits Cash Counter Cleaning Card,Pre-Saturated Currency Counters Card,Disposable Currency Counter Cleaning Card,Currency Counter Cleaning Card Miraclean Technology Co., Ltd. , https://www.mrccleanroom.com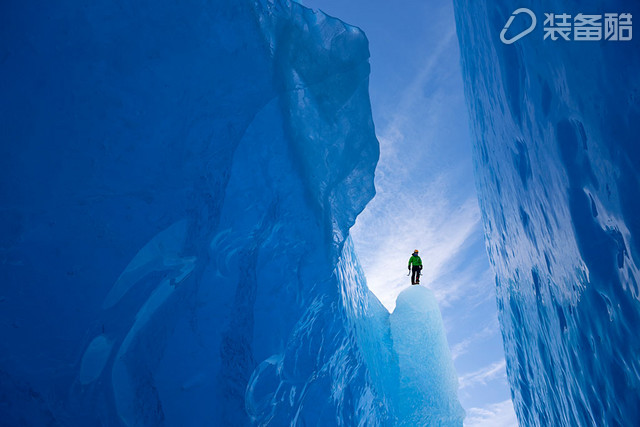


Let you see and understand the ice climbing tutorial, climbing 5+ is not a dream